Monday, 2 March 2015

Superfood salad

I have been really focusing on eating healthy this year after having baby.  I have also only recently discovered the superfood quinoa.

I fancied a filling salad this evening so a quick search online and a few tweaks later, I ended up with this yummy recipe below.  It uses four superfoods so there is no guilt whatsoever, but is certainly not lacking in taste.  Trust me - I don't do bland!


Ingredients

Salad
1/3 cup quinoa
1 1/3 cup water
1/4 cucumber chopped
6 cherry tomatoes halved
1/2 avocado cut into pieces
1 small red onion chopped
A small bunch of kale leaves
1 tsp chia seeds
2 tbsp grated cheddar cheese (optional)

Dressing
1/4 cup extra virgin olive oil
1 small pod garlice minced (or you can use garlic powder)
2 tbsp lemon juice
1 1/2 tbsp dijon mustard
Salt
Crushed black pepper


Method

1.  Bring quinoa to a boil with the water.  Once boiling, simmer for about 15 minutes covered until cooked through. 

2.  Steam the kale for about 7 minutes until the leaves are tender. 

3.  In a bowl, place the kale, add the quinoa followed by all the other ingredients except for the cheese.

4. Mix the ingredients for the dressing together.  If you like it less strong, reduce the quantity of mustard. 

5.  Drench salad ingredients with dressing, top with cheddar cheese and give it all a good toss. 

6.  Enjoy your bowl of goodness!  

I promise you, it tastes yum :)


Friday, 20 February 2015

'Carrot Cake' Pancakes

I am trying to reduce refined sugar from the family's diet.  Some days are huge successes and some days are epic fails but I keep at it in the hope that one day we will habitually say no to refined sugar.  In keeping with this, we tried a 'carrot cake' pancake. 

100 g oats
3 eggs
1 medium carrot grated
2 tsp ground cinnamon
1 tsp ground ginger
1 tsp baking powder
4 tbsp low fat natural yoghurt (you could use flavoured or low sugar if you prefer)

Blitz all the ingredients in a blender.  This makes four large pancakes or eight little pancakes.   Serve with your choice of topping,  Lil Man J happily ate 4 little ones with just a little blob of butter! 

Even if you did dish this up with maple syrup or honey, you have cut out refined flour and sugar in normal pancakes.  

Sunday, 30 November 2014

Christmas kindness advent

I recently read an article about the 'entitlement' culture that our children seem to be a part of.  The article went on to point out how we as parents have a tendency to fuel this entitlement culture. Whilst I understand what the author says and to some extent, I am guilty of it as well as a parent, the reality is also that our children live in a very different world to the one we did and it is a herculean task to take away all the commercialism and materialism out of their lives (at least in my opinion).  

So to balance it, I thought we could do something that teaches Lil Miss J to do things for others this holiday season and I'm hoping we can carry it through past the holiday season as well. 

A quick look at pinterest revealed loads of ideas and here is our version of the Kindness Advent (which will be opened alongside her 'Frozen' advent calendar - I know, I know!).  


We have some very simple ideas on there - some as simple as choosing books to donate to charity, buying some food and donating to the homeless shelter, writing a thank you letter to her teachers, leaving a treat for the postman etc.  The toughest task was slotting the activities based on our days' commitments in December.  There will be a certain degree of flexibility - but as long as we do one random act of kindness a day, we will have achieved what we wanted to out of this exercise. 

The idea is to focus her attention on doing things for others and realising that this in turn will bring her joy. 

This cost me nothing to make! The envelopes are school dinner money envelopes and I just stuck some printed images on them :) 

Thursday, 16 October 2014

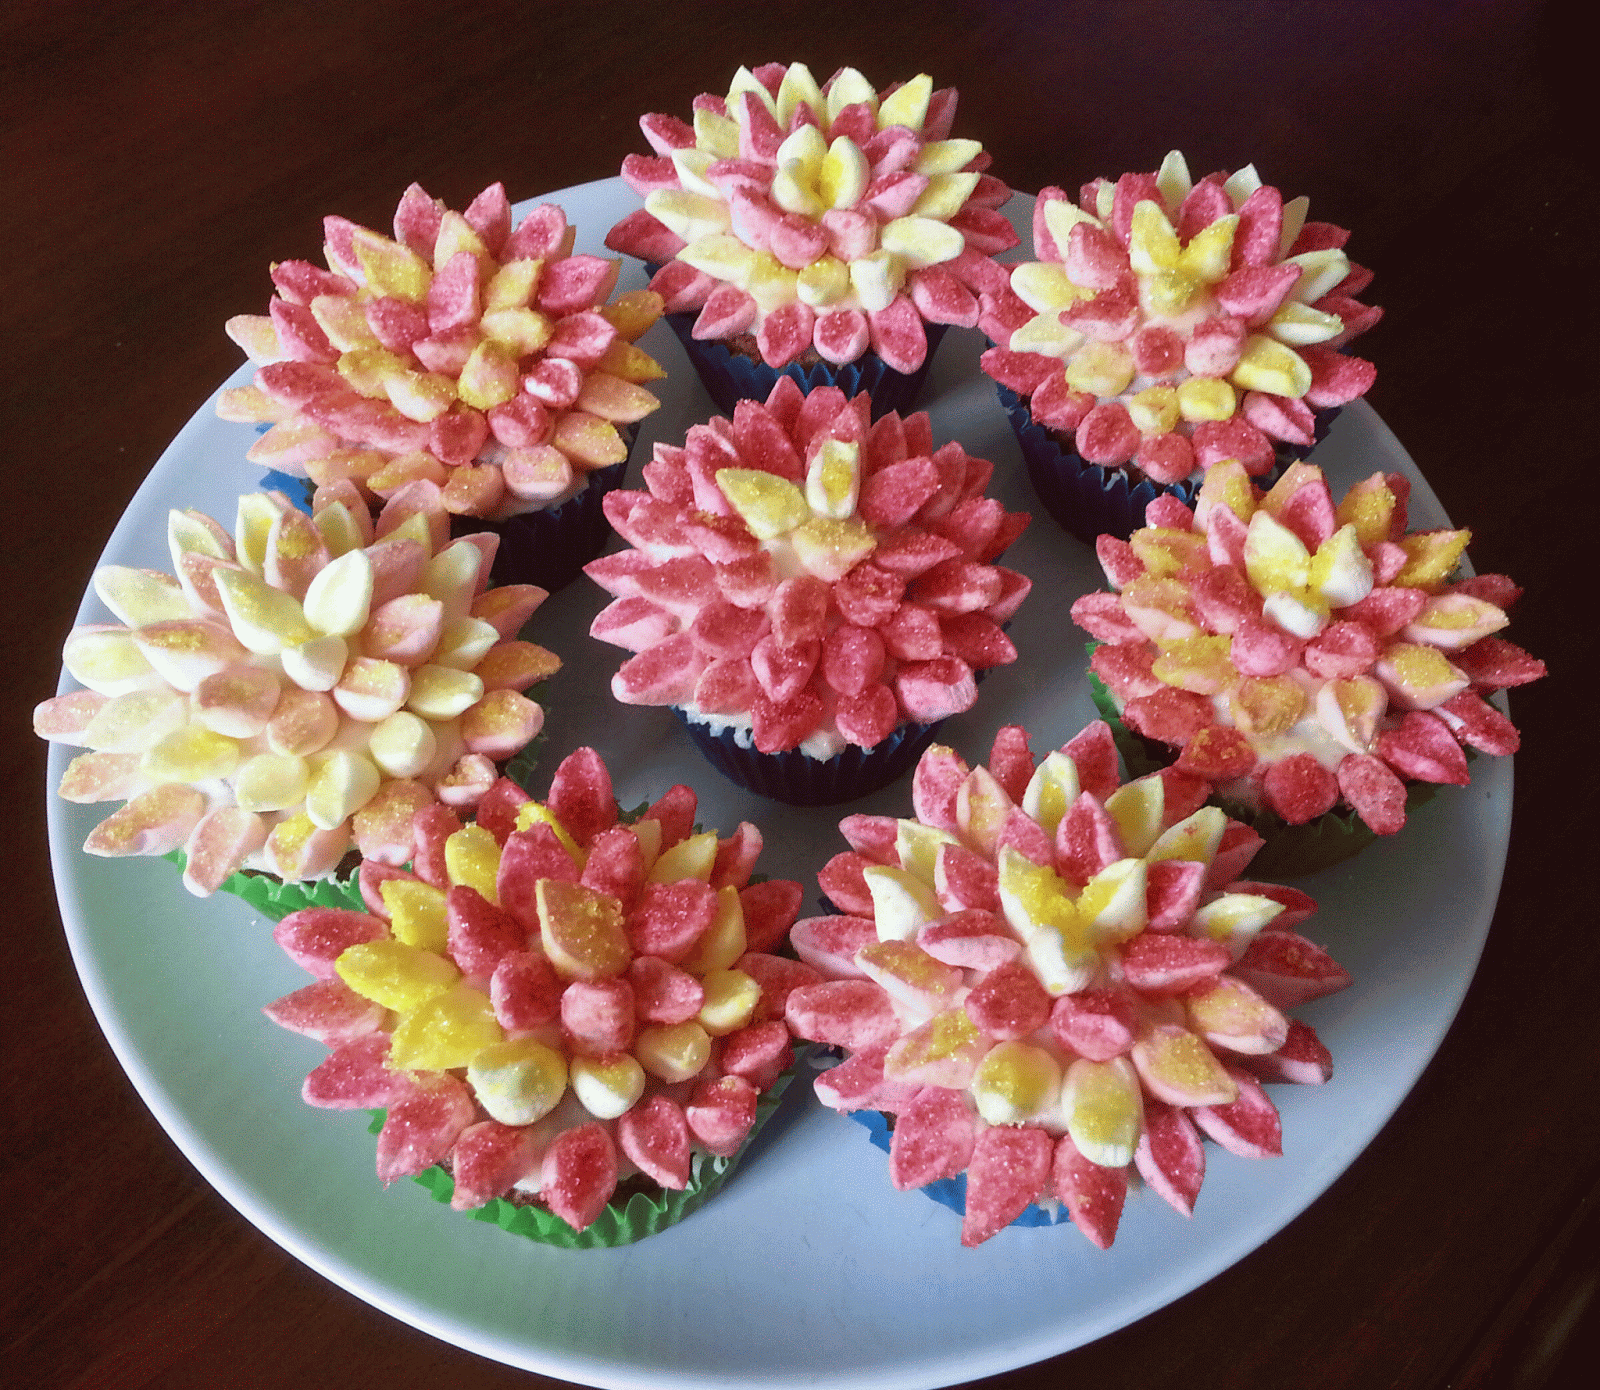
Flower cupcakes

So I have been on a blogging hiatus for over a year now.  Blogging fell by the wayside. Life and the universe got in the way - so on and so forth.  


In the last month or so, I joined a Whatsapp group with my school batchmates.  I don't get to spend a lot of time on it but I'm grateful to those on there that encouraged me to start blogging again.  

So I'm trying to start up again - let's hope it lasts!   I've always loved baking and most of what I bake is usually foolproof but icing and frosting - that's a whole different kettle of fish and not one I'm overtly comfortable with.  But having seen these flower cupcakes on facebook and pinterest, I thought I'd try them out to see how they turn out. 


Not too shabby for a first go!


For the vanilla cupcakes: -

1 cup self-raising flour (sifted)
1 cup sunflower oil
1 cup caster sugar
1 tsp vanilla extract
2 eggs

1. Preheat oven to 170 degrees celsius.  Prepare the cupcake tin with cupcake liners. 

2. In a bowl, whisk together the oil and sugar until well mixed. Add one egg at a time and whisk thoroughly.  Add vanilla extract and mix. 

3. Spoon in the flour and mix with a light hand. 

4. Using an icecream scoop or ladle, pour in the batter into the cupcake liners filling them about halfway. 

5.  Bake for about 15-20 minutes until a cake tested inserted in the middle comes out clean. 


For the buttercream: -

40 g butter
125 g icing sugar
1/2 tsp vanilla extract
15 ml milk

1. In a food processor, add in softened butter and icing sugar and beat using the whisk attachment. 

2. Add vanilla extract to the milk and pour whilst the food processor is on. 

3. Beat for 2 minutes until the icing is smooth. 

For the flowers: -

Mini marshmallows
Coloured sugar

1. Cut the mini marshmallows diagonnally. 

2. In a ziploc bag, pour in the coloured sugar.  Add the cut marshmallows to this sugar.  The sugar will stick to the sticky part of the marshmallow creating the "petals".

I didn't have any coloured sugar, so I made my own by putting some sugar in a ziploc bag and adding a few drops of food colouring and then mixing the sugar around. 


To assemble the cupcakes: -

1. Take a cupcake and spread a layer of buttercream on it.  The buttercream is only a glue for the marshmallows. 

2. Take out the marshmallows from the sugar and arrange the petals starting from the outside.  

Saturday, 3 August 2013

Oven fajitas

This is an awesome quick throw together kind of meal - perfect for when you've had a busy day at work and  need to get dinner on without much preparation.  I had fajita seasoning at home which I used but you can create  your own by following this recipe.

I didn't really follow any perfect quantities for this recipe but I'll try to put down some to give you an idea.

You could go vegetarian with this recipe if you prefer.  I have also made it with large portobello mushrooms instead of the chicken and it tastes just as good.


Ingredients

1.5 chicken breast cut into strips
1 yellow pepper
1 green pepper
1 large onion
150 g mushrooms
Handful coriander chopped
3 tsp smoked paprika
3 tsp fajita seasoning
Olive oil to mix
Salt to taste
1 lemon

To serve - tortillas, salsa and creme fraiche

Method

1. Cut all the vegetables into strips and halve the mushrooms.

2. Throw in the vegetables and chicken on to a baking tray lined with greaseproof paper.

3.  Sprinke fajita seasoning and smoked paprika.  Add a glug of olive oil and some salt (if needed - this depends on how salty your fajita seasoning is).

4.  Give it all a good mix until all the vegetables and chicken are coated with the olive oil and seasoning mix.

5.  Bake in a hot oven at 180 degrees celsius for about 20 - 25 minutes

6.  When done, take out of the oven, sprinkle with coriander and give it a good squeeze of lemon.

7.  Roll up in a tortilla with salsa and creme fraiche and enjoy!  You can use sour cream if you prefer but i used low fat creme fraiche.


Monday, 17 June 2013

Black bean and avocado enchiladas

This is my first attempt at making enchiladas and even then I ended up making a vegan option but the flavour is so so good - and of course keeps me away from the cheese! 

The enchilada sauce is also made from scratch but it literally takes less than 10 minutes and is so easy to throw together. 

You can find the original recipe at Budget Bytes.

This is my version.  I made a few minor substitutions to include ingredients available in the UK and also to what was to hand at home.


Ingredients

Sauce
Plain white flour - 2 tbsp
Sunflower oil - 2 tbsp
Chilli powder - 1 tsp
Water - 2 cups
Double concentrated tomato puree (available in a tube) - 3 oz.
Cumin powder - 1/2 tsp
Garlic clove (minced) - 1 small
Cayenne pepper - 1/2 tsp (leave out if you don't like your sauce hot)
Salt - 1/2 tsp
Dark cooking chocolate - 4 little squares

Enchiladas
Black beans - 1 can drained
Avocado - 1 medium chopped (I use hass avocados as I think they have loads more flavour)
Tomato - 1 medium chopped
Frozen corn - 1/2 cup
Green onions - 2 stems
Coriander - one handful chopped
Salt - to taste
Flour Tortillas - 4 for a small oven dish.
Garlic clove (minced) - 1 small
Lemon juice - 1/2 a lemon


Method
Sauce 

1. In a sauce pan combine the sunflower oil, plain white flour, chilli powder and minced garlic. Cook over a medium flame until it starts to bubble.  Cook for two minutes. Add the water whilst whisking continuously.  Add the tomato puree, cayenne pepper, cumin powder, salt and chocolate squares.  Whisk together and heat on a medium flame until it comes to a simmer.  At this point the sauce will start to thicken.  Take off heat and set aside until you are ready to use it.


Enchiladas

1. In a bowl, combine the black beans, frozen corn, tomato, coriander, green onions, tomato, minced garlic, salt and lemon juice.  This is so good you could eat it straight from the bowl like a salad.

2. Coat an ovenproof dish with non-stick spray. Get your tortillas out and scoop in the filling and roll each tortilla. Place the tortillas so they are tightly packed in the ovenproof dish.

3. Pour the enchilada sauce so that all the tortillas are covered.

4. Bake in a pre-heated oven at 175 degrees celsius for about 25 minutes or until the edges start to bubble.  Take out  of the oven. Garnish with some coriander, dish up and enjoy!

These keep very well for lunch the next day!  This is a perfect meatless/vegan meal.  Try it - you won't be disappointed.


Saturday, 11 May 2013

Lemon and cranberry loaf

Now that spring has finally made an appearance, I find myself wanting to use all things citrusy.  I love the freshness that oranges and lemons exude especially when used in desserts.  

This recipe has nothing to it - it is so easy to throw together.  In fact, Lil Miss J came home one day with it from having baked it at the childminders and so I had to ask them how they made it.   So much flavour from such a simple recipe. 


Ingredients

Self-raising flour - 175 g 
Butter - 175 g 
Caster sugar - 175 g 
Eggs - 3
Dried sweetened cranberries - 1 handful 
Juice and zest of two lemons

Method

1. Pre-heat oven to 180 degrees celsius. 

2. Sift flour and set aside. 

3. Cream butter and sugar together until light and fluffy.  You can use an electric beater but we tend to hand beat it as my baking is always done with Lil Miss J who loves 'mixing'. 

4. Add one egg at a time and beat until incorporated.  

5. Lightly fold the flour in.  Add the juice and zest of two lemons and the cranberries. 

6. Pour into a loaf tin and bake at 180 degrees celsius for 40 to 50 minutes.  If the top is browning too quickly, you can cover it with silver foil.  

7.  Remove from oven and let cool in tin before turning it out on to a cooling rack.  When cool, cut into slices and serve. 

Enjoy :)

Saturday, 27 April 2013

Upcycled shoe rack

I've made one of these before and you can see it here. But this time, we went one step further and used the paintings that Lil Miss J makes at nursery to decorate the A4 paper boxes.  A fun afternoon activity and her shoes are all nice and tidy. 


Wednesday, 13 February 2013

Spinach and cheese pie

I had been looking at a spinach pie recipe on Budget Bytes for ages.  Yesterday the craving hit an all time high so I proceeded to make it with whatever ingredients I had lying about!!! 

I love puff pastry - I know its not that good for you in terms of being healthy but what can I say - I do love it.  Combine it with spinach, mushrooms and feta which are some of my favourite ingredients and you're in food heaven!  

So here it is - a very simple to throw together meal.  I hope you enjoy it as much as I did.


Ingredients
Spinach (frozen cut) - 16 oz 
Mushrooms - 5-6 sliced thickly
Onion - 1 medium
Garlic clove - 1 
Nutmeg - 1/8 tsp
Feta cheese - 1/2 cup
Mozarella - 1/2 cup
Parmesan - 1/4 cup
Cayenne Pepper/Chilli powder (optional) - 1 tsp
Salt - 1/2 tsp
Eggs - 3
Puff Pastry - 1 sheet (I bought the ready version)
Oil - 1 tbsp

Method
1. Thaw out your frozen spinach. Mix together the spinach (after you've squeezed out all the water), feta cheese, mozarella, parmesan cheese, nutmeg, cayenne pepper and salt. 

2. Chop the onion and garlic.  Take some oil in a pan.  Lightly saute the onion and garlic.  Add the mushrooms and quickly saute till they are just soft.  Add some salt and then add this to the spinach mixture.  

3. Check for seasoning and then add 2 eggs to the spinach mixture. 

4.  Roll your puff pastry out.  Then place the pastry in an ovenproof dish.  Spoon the filling in evenly and then fold over the pastry to cover the top.  I cut off some excess bits from the side to cover a gap that was left.  Break an egg and beat it up and brush over the top of the pastry to give it a nice glaze as it bakes in the oven. 

5.  Bake for 45 minutes at 160 degrees centigrade. 

6. Once done, take it out of the oven and leave for five minutes prior to cutting it up to serve. 


If you want to refer to the original recipe, you can find it here. 

Tuesday, 5 February 2013

Slow cooker chicken pepperonata

This has become a staple meal in our home....its oh so easy to do and packs oodles of flavour.  The original recipe is from Kayotic Kitchen.  Mine is the slightly Indianised version! 

I love peppers and the combination of peppers, onion and garlic sauteed in a pan is enough to make the house smell divine! 


Here is this super easy recipe:-

Ingredients
500 g boneless chicken thighs
3 bell peppers
1 large onion
3 cloves garlic
1 tbsp dried oregano
1 tsp chilli powder
1 tsp cumin powder
1 can diced tomatoes
1 can cream of mushroom soup
Salt and pepper to taste
2 tbsp oil

Method

1. In a pan, add 2 tbsp oil.  Add the chicken thighs and cook till they get a little bit of colour.  Remove and drain on some kitchen towel. 

2.  In the same pan, add the onions, garlic and bell peppers.  Once cooked, add the chilli powder, cumin and dried oregano.  Add salt and pepper to taste. 

3.  Transfer the onion bell pepper mixture to the slow cooker and add the chicken and diced tomatoes.  Add the cream of mushroom soup.  If you prefer not to use canned soup, leave this out and use some cornstarch to thicken the pepperonata once done. 

4.  Cook on low for 6 hours or on high for about 3 hours.  

5.  Serve with hot rice or pasta sprinkled with a generous helping of cheese - Enjoy! :)

If you prefer, you can make this on the stove top.  Just add the chicken and cover and cook till done. 

Wednesday, 30 January 2013

Veg pot pie

I have had a sabbatical from blogging.....I have gone back to working full time after four years and this doesn't leave me enough time to do as much as I used to.  Between trying to juggle home, work and family, I have had my hands full. 

But I miss blogging and I figured I need to focus and try and get started again.  It may not be as much as I used to  but I need to at least try.

Here's another winner from Budget Bytes.  I tried this vegetable pot pie this weekend and it was amazingly good.  Beth has done all the hard work with putting up the recipe and step by step photos, which you can find here. She has an awesome blog - do take some time to visit it - especially if you enjoy cooking. 


Saturday, 13 October 2012

Black bean and corn quesadillas

With moving house and things up and down on the job front, most of this year has been - to say the least - quite trying! Its taught me to live a more frugal lifestyle and to be honest, once you start to do that - you wonder why you spent so much money wastefully in the first place! 

I've just found work again but have been trying out different recipes over the past couple of months whilst I was off work - which is just as well because it has stood me in good stead now when I have to work full time! 

One of these fantastic recipes, I found over at Budget Bytes. This is my new favourite blog - Beth does some awesome recipes on a budget - inventive cooking is so much fun!

The only change I made to mine was that I didn't use any cayenne pepper in the taco seasoning - just because I didn't have any! Other than that, these were super easy and taste amazing.

You can find the original recipe here. They freeze beautifully - perfect for a quick lunch or snack!

Enjoy!


Friday, 7 September 2012

Lil Miss J turns Lil Miss Helper!

Lil Miss J enjoys helping out  - it started out when she was younger, as a means of getting her involved in doing things around the house so that I could get the housework done with  her about.  But I have also realised along the way that children do not view things as chores.  With a little bit of fun injected into it, there is nothing a child loves more than being involved and helping mum out! 

I tend to buy fresh coriander a lot as it gets used in plenty at home.  Lately I've also been buying some fresh mint.  The best way to keep these fresh for long is to pick the leaves and store them in an airtight container lined with a paper towel and then place the container in the fridge.   Coriander stalks have loads of flavour, so don't throw these out.  In my house they get used in a mint coriander chutney and also to flavour soups. 

I got Lil Miss J to help me pick the leaves.  I find this is a good concentration activity for her and since I'm with her doing it, she enjoys it a lot. She is usually far more fussy than I am - usually saying "we can't have this leaf mummy - its brown!" or more recently - "mummy look at the leaves properly before you put them in!!!".  She can now recognise the difference between the leaves and knows both  herbs by name.  

I got her to smell the mint leaves and asked her what they smelled of.  "Toothpaste" came the prompt reply! A great way for children to build associations.

We talked about how different the leaves looked, how they smelled different, how  the stalks were different , how they felt different to touch and even how they were slightly different shades of green. 

It took us the better part of 40 minutes to do this and I could have possibly done it in 15 myself.  But not only did a job that needed doing get done, she enjoyed killing some time with mum, she learnt to recognise shapes, colours, smells, touch all in one activity!  


Thursday, 16 August 2012

Hair clip holders

I've been thinking for a while, trying to come up with a creative way to store Lil Miss J's hairclips - she usually loses one of the pair and then we're left with all these single ones swimming about.  Anyways, we were sorting through her stuff this morning and came up with the idea of using toilet roll tubes to create hair clip holders! 

I've been on a crafting sabbatical - I'd forgotten how therapeutic it is.  Not only was it a morning activity we both enjoyed, I didn't have to spend a single penny on it as I already had the materials on hand! Recycled crafts are the best!


Toilet roll tube, some nice craft paper and some mod podge.  Cut paper to the size of the tube.  Cover the tube with mod podge and then stick the paper on smoothing out any air pockets.


Once the paper is on, brush mod podge over to create a protective coat and then let dry.


Add the hair clips! Don't they look cute? 

Friday, 10 August 2012

Lemony veggie & prawn pasta

A simple dinner with lots of yummy flavour.  This is the link to the original recipe.

I made a few tiny tweaks. I sauteed two spring onions, 3 cloves of garlic, some cherry tomatoes and the prawns in a little olive oil, adding some dried thyme and chilli flakes to give it a bit of oomph. I also used the juice of a whole lemon as I like the sauce very lemony!!!!

Lots of flavour and very quick to prepare! 

Enjoy! 

Monday, 30 July 2012

Hummus Melts

I found these on Pinterest and our peckishness yesterday provided the perfect opportunity to try them out.

Here is the link to the original recipe.  I made a couple of tiny changes.  I added a basil leaf torn into two on top of each muffin and since I didn't have mozarella, I used cheddar.  Of course, cheddar is saltier than mozarella, so if you're using shop bought hummus, keep the salt quotient in mind and use mozarella instead.

These are very yummy and make a filling snack or mini meal.

Enjoy!


Sunday, 22 July 2012

Vegetable Quiche


This was my first attempt at quiche and I am pleased to say that it turned out awesome (well the pastry crust was a bit soggy but that didn't stop it from being awesome!)

Here's what you will need: -

2 peppers, sliced
3 large mushrooms, sliced
3 spring onions, both white and green parts sliced
Dried herbs (I used oregano and thyme) - a pinch
4 eggs
1/2 cup milk
Bunch of fresh coriander, chopped (you can use parsley)
Ready rolled shortcrust pastry
1 tbsp olive oil
1 tbsp melted butter
1/2 cup grated cheddar cheese
Salt 
Pepper


Method
1. In a flan tin, lay the pastry out and cut off the excess.  (I saved these to make jam tarts with Lil Miss J - food doesn't get wasted in my house - no sirree!!).  Now I didn't do this, but you should probably brush the pastry with some egg and let it blind bake for about 5 minutes so that it hardens and doesn't get soggy from the filling you will put in later.  I put a layer of grated cheddar cheese on the base.

2. In a pan, heat the oil and saute your veggies until they are soft. Add the dried herbs, salt and pepper to season.  Then transfer this to the pastry base. Sprinkle with chopped coriander.


Look at all that gorgeous colour!

3.  Mix together the eggs, milk and melted butter.  Pour this mixture on to the base, sprinkle on some grated cheddar and bake at 190 degrees for approximately 40 minutes. 


And this is what you'll end up with! Now that is gorgeousness on a plate - even if I say so myself!

You don't have to stick with these veggies - use whatever you have lying about and if you don't want a veggie version, you can always chuck in some bacon or ham! 

Happy eating!

Saturday, 21 July 2012

Cinnamon Toast Muffins

We've just moved house a couple of weeks ago and are slowly settling in to life outside of boxes again! I have some time on my hands now as I've yet to begin job hunting - so am making the most of this time with Lil Miss J!

We made these oh so yummy Cinnamon Toast Muffins that I found on Pinterest to donate to a bake sale this morning. Here is the link to the recipe.  They are super quick to make and taste very yummy for such little effort.

My kitchen was filled with the most gorgeous aroma as these were baking merrily in the oven :)


Thursday, 28 June 2012

Caramelised onion and goat's cheese tart

I think I found this recipe a magazine somewhere recently and really wanted to try them.  I love simple easy dinners and ready rolled puff pastry is my new best friend! 


Here's what you need:-

Sheet of ready rolled puff pastry
Onion - sliced
Tomato - sliced
Goat's cheese
Parmesan or Cheddar cheese
Splash of wine (I didn't have any so I used red wine vinegar instead!)
Thyme - fresh is good  - I didn't have any so I used dried and it still tasted yum
Chilli Flakes (optional)

Method

1.  Get your rolled puff pastry out from the fridge.  Cut into squares.  Rounds look better but squares make less wastage and I don't like wasting food!  With a knife scour a 1 cm line around the edges and prick the centre with a fork.  Return pastry to fridge.

2. In a tiny bit of oil, saute the onions until nice and browned.  Add a splash of wine (or wine vinegar) to deglaze the pan and let it reduce.  Add dried thyme.  I put in some red chilli flakes too - this is optional.  Remove from heat. Season with salt.

3. Get your pastry out of the fridge.  Place some grated parmesan or cheddar on the pastry making sure to leave that 1 cm edge which you scoured the knife on. This will allow your pastry to puff up nicely around the edges.  Place the caramelised onion mixture, sliced tomato and some pieces of goats cheese.  Bake at 180 degrees for about 15 minutes until the pastry is done!

4.  Dish up with some salad greens.  

For a healthier version, I grilled some aubergine and courgettes and turned this into Lil Miss J's dinner.  She loved doing it all herself.


Friday, 22 June 2012

Father's Day albeit a bit late

I wanted to share what Lil Miss J made for daddy on Father's Day but never got around to posting it, so although its now a tad bit late, here it is anyway.  She wanted to make him a card and post it to him. I didn't have loads of crafty bits on hand, so a few buttons and some stickers had to do!  But it turned out pretty nice :)


And she was most thrilled to put it into an envelope, stamp it and we went off hand in hand to the post office! Oh the simple pleasures of childhood! :)

Related Posts Plugin for WordPress, Blogger...