Thursday 15 December 2011

Chocolate fudge cake

Last week, we threw my friend a baby shower and more often than not, whenever we meet up with our friends, I'm the one to provide the dessert! Since she loves chocolate, I found a recipe for a Chocolate Fudge Cake.

The original recipe calls for chocolate buttercream, but since this was a very light cake, I opted to use a ganache made with 175 ml double cream, 200g dark chocolate and 25 g butter. Heat the cream and butter together until the butter is fully melted and mixture just starts to bubble.  Take the pan off the heat and add in the broken pieces of dark chocolate and stir.  The heat from the cream will melt the chocolate and you get a lovely silky smooth ganache.

Now I'm not very good with frosting - but I am trying and although it is not a neat finish, I was pretty happy with how this one turned out! :)


Monday 12 December 2011

Cake for a baby shower - except its made with nappies!

I saw a nappy cake a few months ago at an arts and crafts fair and thought it looked great.  I did think the £30.00 odd price tag was a bit of a rip off though! I had a friend's baby shower coming up - so thought I'd give it a go.  I found a tutorial on youtube (what would we do without it???).

Turned out its dead easy to do and costs nowhere near that much - it does take a bit of time and patience though but the end results are well worth it! 

I wonder if I should start taking orders! (*pulls a cheeky face*)


Sunday 20 November 2011

Birthday special

I have been absolutely rubbish at blogging recently.  I have had so much going on and I was so hoping to have gotten back in to crafting in time for Christmas - but there is still time yet! Hopefully :)

Little Miss J celebrated her birthday last week and when I asked her what she wanted, all she said was "I just want a cherry cake Mummy!".  So how could I not make one?

I had never made a cherry cake before but managed to get a recipe for one.  The original recipe used lemon peel and almond essence, but I am not a big fan of almond essence so I left it out and made a few further tweaks to the recipe!  


125 g glace cherries (washed and dried)
225 g plain flour
50 g semolina
2 1/2 level tsp baking powder
150 g butter at room temperature
125 g golden caster sugar
1/2 tsp vanilla essence
2 eggs
5 tbsp cold milk
Salt - a pinch

1. Toss the washed and dried cherries in 2 tbsp of flour and set aside. 
2. Sift together the flour, semolina, baking powder and a pinch of salt.
3. Rub in the butter.  Add sugar and cherries.
4. Beat together the eggs, vanilla essence and milk.  Stir into the dry ingredients.
5. Line two 7" sandwich tins and bake at 175 degrees celsius for about 20 minutes or until the sponge is firm to touch. 

You can make this in one big cake tin or a loaf tin and have it just as it is.  Since it was a birthday cake, I made some buttercream icing and spread it on one cake and topped it with morello cherries.  Then put the other cake on top to create a sandwich cake and then I iced the top. 

I was pretty happy with the result, especially since I don't usually frost cakes! And Little Miss J loved it too!

Thursday 6 October 2011

Happy Dussehra

Dussehra is the festival in the Hindu calendar which celebrates the victory of Lord Rama over the demon Ravana, thus symbolizing the triumph of good over evil.   In India, the build up to the festival is over nine nights with the tenth day being celebrated as "Dussehra".  I miss the festivities the most living away from India.  The music, the dancing, visiting friend's houses and the traditional 'Haldi kumkum' in the West and the giving of 'Vetala Pak' in the South - all things I grew up with.  

Living so many miles away from home, we don't always get to celebrate all the festivals with the fervour that we would were we living in India.  I love that festivals in India are so colourful, so vibrant and so full of life. 

I wanted to involve little miss J in making something for the house this Dussehra.  So we decided to handcraft a 'Toran'.  A 'Toran' refers to a decorative door hanging, usually decorated with marigold flowers and leaves of the mango tree, or a string that is tied on the door with the flower on it as a part of traditional Hindu culture. A Toran may feature colours such as green, yellow and red. 

I cut out some leaf shapes out of cardboard and little miss J painted them. 

I had made some flowers out of tissue paper. They actually look a lot like marigolds!!


Then I took some garden twine and stuck the leaves and flowers with some double sided tape.  Our 'Toran' now hangs on our door and will stay there till Diwali comes around - I'll follow that up with a separate post :).


Wednesday 5 October 2011

Roasted stuffed butternut squash

The heatwave is gone and autumn has definitely come a knocking! I've pinned a host of autumn recipes I want to try, but I saw this recipe from Nigel Slater on a television show the other day and couldn't wait to give it a go.  I was not disappointed.  


I tweaked the original recipe slightly.  I used leeks instead of onions, threw in some chopped red pepper for colour.  I also added a tiny sprinkle of some cheddar on top, because I love my cheese and some finely chopped coriander to garnish. 

Dished up with a side salad - it was very very satisfying! :)

Its not a very heavy meal, so if you want to bulk it up, you're probably going to need some potatoes on the side.

Tuesday 4 October 2011

Stewed plums with yoghurt

Usually when I try a new recipe, I've looked at it quite a few times before I actually get around to making it.  This one was an exception to the norm.  Little Miss J wasn't very well today and had gone off most of her food, but she loves yoghurt and I thought it would help soothe her tummy so I wanted to make it a bit interesting and include some fruit with it.  

I had some plums that needed using up, so using a combination of recipes I found on the internet, I made some stewed plums and mixed it into some natural yoghurt, except it turned out so good that it was what I had for dessert tonight! Mr. J who is not a fan of sweets & desserts kept stealing spoonfuls from me and then even asked for seconds which is no mean feat!

This would also be great served warm with some vanilla icecream and literally takes about 5 - 10 minutes of prep time.  The remaining 20 - 25 minutes is just simmering time and letting the heat do all the work!

Here's what you need (this makes roughly 4 - 5 small servings): -

2 cups plums, chopped into tiny pieces
1/4 cup dark muscovado sugar
1/2 cup water
1/4 inch stick of cinnamon (or you could use cinnamon powder if you prefer)

Put in all the ingredients in a saucepan and bring it to a boil on low heat and allow to simmer for about 20 minutes.  Allow to cool and mix with some natural yoghurt and dig in! 


Much better for the little ones that store bought stuff and tastes scrummy! 

If you have palm sugar (also known as jaggery), this would work great too.  However, jaggery melts and thickens quicker than muscovado sugar, so you might want to let the plums stew for about 10 minutes first before adding the jaggery.  You can vary the amount of sugar depending on how tart the plums are.

Monday 26 September 2011

Stuffed courgettes

Back along I did a recipe for herb crusted stuffed courgettes. This is a fabulous variation I found on pinterest and you can find the link to the original here. I have to say I prefer this version!!! I tweaked it slightly from the original as I have no curry powder in the house! Can you tell its an Indian house??? Instead I added a pinch of turmeric, a some finely chopped green chillies (I can't cook without chilli!), some finely chopped garlic and a pinch of garam masala. 

Here they are ready for the oven!


Just look at these little lovelies!


Paired up with some cumin and rosemary potatoes - they made for a perfect meal :)


Wednesday 21 September 2011

DIY fairy princess wand

I sat surrounded by all my craft stuff after ages today and it felt so good!!! Little Miss J has to dress up like a princess  for a charity fundraiser they're doing at nursery.  Now I don't have a princess outfit for her but I do have a fairy outfit with wings so she's going as a fairy princess.  Since no self-respecting fairy can go without a wand, I set about to fashion her one from stuff I had lying around the house.  It had to be pink to match her dress and of course there had to be glitter!!!  The rest of it was a piece of cardboard for the star, some pink paper, a bubble wand that she no longer plays with, some kitchen foil and some mod podge.


I love how it turned out! Thrifty DIY rocks!

Friday 16 September 2011

I'm still here!

I have sinned so much at blogging recently.....its not because I haven't wanted to - I've just  had way too much going on and very little time to do it all!

Sometimes I think I've got too much going on.  I've been involved in learning soul healing recently and that has been taking up quite a lot of time and commitment.  And although I want to do it all, I can't - so some things take precedence over others and for a minute, crafting has taken a bit of a back seat. 

Hopefully I will have enough time on my hands to get back in full swing soon!! Now that fall is in the air - I'm hoping to try out some new autumn  recipes and get into some festive crafting with little miss J


Thursday 8 September 2011

Crostini with goats cheese & red onion marmalade

I really really like goats cheese and back along we ate an appetizer at a restaurant that had some grilled goats cheese served with red onion marmalade. The flavour combination just explodes in your mouth.  So it was but the obvious choice to try and replicate it at home and I found the perfect recipe here.

I didn't have a baguette around so I used ciabatta, but if you are trying this I think a baguette would work much better as the ciabatta is far too thick.  Also, I didn't have any mustard cress around, so I just topped mine with a little coriander.

Give this one a go - you won't be disappointed! :)


Saturday 3 September 2011

Tin can redo

This is my first attempt at using Mod Podge.  Decided to repurpose some tin cans that I had.  They didn't turn out too bad.


And worked out as a perfect container for these Egg Carton flowers that we created some time ago.

Saturday 27 August 2011

Lemon cheesecake

I absolutely adore cheesecake and this is my favourite recipe for it. You can find the recipe here on the Good Food Channel.


The only change I have made is that I only used 150 ml of sour cream for the topping instead of the specified 250 ml. I also used light cream cheese and I realized only when I was assimilating the ingredients for the topping that I had no stem ginger in the cupboard! Duh! So it ended up being just a lemon cheesecake instead!

If you've never made cheesecake, this is a good one to start with as it is a foolproof recipe! I hope you enjoy it as much as I did :)

Saturday 20 August 2011

DIY Notice Board

My friend Ro, who blogs over at Jellyhead's Finished Projects wanted to make our friend, Claire at work a birthday present.  We are both into crafting and wanted to create something from scratch.  Claire is well liked by her clients and receives loads of thank you cards, so we decided to give her a board she could pin them all up on!

Ro's hubby kindly got us a piece of plywood from his workplace.  I then used some lovely material that my brother had bought me from Thailand ages ago (it was just sat in my stash  - I guess this was its purpose!!) and used Fabri - Tac to glue it down to the back of the board.


Ro then added some pegs she found in the craft section.  She also used normal clothes pegs, but these seemed too big so she ended up with more of these little ones. 


And ta da - this is what we came up with.  We were really happy with the result.


Monday 8 August 2011

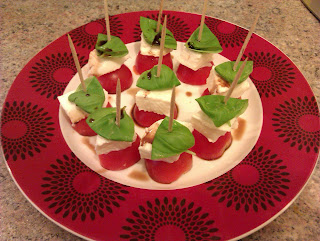
Bite size caprese salad

I saw this while browsing Pinterest and just had to make my own!  There is something heavenly about the combined juiciness of a cherry tomato, the density of a chunk of mozarella and the freshness of a basil leaf, brought together with a drizzle of balsamic vinegar and olive oil! Pure bliss and oh so simple! 

Friday 5 August 2011

Blueberry pancakes

What better way to enjoy a lazy morning brunch than dishing up pancakes with Little Miss J.  So that's exactly what we did today! And this was the result! 


Ingredients

250 g flour
1/2 tsp salt
2 tsp baking powder
3 tbsp sugar
300 ml semi skimmed milk
1/2 tsp vanilla essence
2 eggs beaten
40 g butter melted
1/2 lemon juiced
125 g blueberries
Maple syrup to serve

1. Sift together flour, salt, sugar and baking powder.

2. Mix together milk, eggs, vanilla essence, melted butter and juice of half a lemon.  The lemon juice will split the milk, but don't worry about this as it will lend it the tang that buttermilk gives - alternatively, you can substitute buttermilk for the lemon juice & milk. 

3.  Using a whisk, bring batter together trying to reduce the lumps. 

4.  Spoon a ladle of batter into a hot pan and cook on both sides.  Keep the pancakes in a warm oven (switched off) until ready to serve. 

5. Drizzle with maple syrup and serve.  Enjoy!

Sunday 31 July 2011

Save the Planet Sunday #9

Little Miss J loves to paint....and no matter what project we start off with, somewhere along the line, it ends up with her painting her hand so that she can make handprints!!  So I try to come up with something she can do that's different to try and keep her attention focused......that's how we ended up painting some flowers fashioned out of empty egg cartons - although I have to say that did not deter her in any way from doing the handprints!!! 

This turned out to be a nice eco-friendly craft and she did enjoy doing it - although it does involve drying time so may not be suitable for very young children.  I had to boost Little Miss J's patience level by letting her do the handprints while we waited for the paint to dry!!!!

I cut up some empty egg cartons.

 Then she set about painting them.


The cardboard does get quite soggy so you have to keep an eye.

We had to wait until the inside dried to paint outside and here is what happened in the meantime!!!!


Once the inside was dry, we painted the outsides.


A lolly stick for the stem and some crumpled tissue paper for the centre.  And she had her 'present' ready for daddy, for when he came home from work just as all her craft projects are!


Thursday 28 July 2011

My first guest post!!!! 'Christmas in July'

Today you can find me with my very first guest post at Fireflies and Jellybeans for the Christmas in July series!


Come and take a look and let me know what you think!

Wednesday 27 July 2011

Beauty in my backyard

These lovely plants in my little backyard have been making me smile everyday, so I thought I'd share them with you. 


Aren't they beautiful?

On another note, I was featured on Passionately Artistictoday for my Dark chocolate and Orange cake

Sunday 24 July 2011

Save the Planet Sunday #8

Its been a very hectic week and I am so exhausted - I think I'm trying to fit in too many things and my mind is in overdrive......so this is a quick save the planet post.

Did you know that you can use baking soda (bicarbonate of soda) to exfoliate?  The best way to do this is to either take a couple of teaspoons of baking soda in your hand and adding some water and spreading it on your face in a circular motion followed by rinsing it off. 

Alternatively, you can use it mixed in your cleanser.  In both cases, follow it up by moisturising your skin. You will be able to see the effects very soon . As with all exfoliants, use no more than 2-3 times per week. Baking soda has neutral ph so is very mild on the skin and it is a fine abrasive powder so works great as an exfoliant. 

Keep well and do your bit to be 'green'.


Wednesday 20 July 2011

Healthy Chunky Monkey 'Icecream'

Little Miss J loves  her food and she particularly loves her pudding.  Which means I keep running out of ideas and am forever on the lookout for treats that she can have that are not laden with sugar.

I found this beauty on Pinterest.


What you need:

Banana, chopped up into chunks and frozen
Chopped walnuts
Dark chocolate - grated (the recipe called for chocolate chips, I didn't have any so improvised)

Pulse the frozen banana in a blender.
Out into a bowl. Sprinkle with walnuts and chocolate shavings and there you have it - a very delicious dessert that tastes just like 'icecream' and the best part of it is that its all natural sugars! Yay! Little Miss J loved it - (and so did I - sshhh!!!)

Mine doesn't look quite as spectacular as the original picture but it tasted great - thats all that matters!


Tuesday 19 July 2011

Pinterest

As if I didn't spend enough time in blogland, I am now totally and utterly a self-confessed Pinterest addict! Its a brilliant concept that uses virtual notice boards.  You can find me on Pinterest here. Check it out - prepare to get addicted!

Sunday 17 July 2011

Save the Planet Sunday #7

It was chucking down with rain outside this weekend - so it was crafting to the rescue for a rainy afternoon.

I had seen these toilet paper tube flowers in a few places in blogland and have been meaning to try them - but they got used for a kiddie craft project - not to mention upcyling toilet roll tubes!!!!

We flattened a toilet roll tube and cut half inch strips.  Little Miss J did try to cut them with her scissors, but they're a tad difficult to cut with kiddie safe scissors, so I helped cut them and she glued them together.


 Then a few clothespins came in handy to hold until the glue held firmly.

 Then we glued a lolly stick to the back and made a pretty flower!


Next time around, I might get her to paint the 'petals' before gluing them together.

Happy recycling everyone!

Wednesday 13 July 2011

Spinach pesto spaghetti with chorizo

Why is it that the tastiest dishes are created when you're trying to use up what's left in the fridge??

I had read a great recipe for spinach pesto linguini here and filed it away to make it sometime.

I had some spinach leftover in the fridge that desperately needed using up and I had about half a packet of fresh basil. So using the suggestion in the recipe above, I created my version. I did not measure any of the ingredients, but will try to put down a measurement below.

Here's what you will need: -

Spaghetti or any other pasta that you prefer.

For the pesto: 
150 g fresh spinach (blanched)
Approx 30 g fresh basil
1 tbsp chopped cashews
1 tbsp chopped walnuts
2 tbsp grated grana pradano ( you can also use parmesan cheese)
3 tbsp olive oil
1 clove garlic

For the sauce
1 tbsp olive oil
1 onion chopped
1 tomato chopped
Sliced chorizo torn into pieces


1. Grind all ingredients for the pesto together in a blender.  (If you want to preserve the pesto and retain its green colour just pour a little olive oil so that the top is covered and refrigerate.)

2. In a pan, pour 1 tbsp olive oil.  Add the chopped onion and saute until translucent.  Add the chopped tomato and the chorizo and cook until tomatoes are soft.  Then add the pesto sauce and cook for about 2 - 3 minutes.  Don't cook any longer as the pesto will lose its lovely green colour and goodness.

3. Pour the sauce over your cooked spaghetti (or any pasta that you are using).  Dish it up and top with a a bit of grated grana pradano or parmesan cheese. 

A very yummy meal and didn't take long to make at all! For a veggie option, you can leave out the chorizo and use whatever veggies you have knocking about! 
Enjoy! :)

Monday 11 July 2011

Vegetable painting

I remember this from when we were in school - using vegetables dipped in paint to make stamps on paper.  So one hot sunny afternoon - we moved our table outdoors and I got little miss J to paint using some okra and french beans.


 Cut the top of the okra off and it makes a lovely 'flower' stamp. 


Then she mixed a few colours and they actually turned out really pretty.


Here she is trying to use a french bean which I cut at a slit so she could make some 'leaves' - but she didn't quite get the hang of it.  My little Picasso still managed a little masterpiece though :))


Sunday 10 July 2011

Save the Planet Sunday #6

This week has whizzed past and I've really found no time to blog - its been so busy around here!!! But I'm hoping that is remedied next week as there is so much I want to write about and so much I want to do - so little time.

Anyways, we went to the 'pick your own' farm for the first time with little miss J this weekend and here's what we came back with!


Look at all that goodness - fresh farm produce - no supermarket packaging one less thing to harm the environment and whats more we had fun picking all of it.  And all of it tastes gorgeous.


What was your little contribution to the planet today?


Related Posts Plugin for WordPress, Blogger...